
関連ページ
- ElasticSearchインストール手順
- Kibanaインストール手順
- logstashインストール手順 ※本ページ
- OpenAMログをElasticSearchに送信する方法
概要
- CentOS7にlogstashをインストールします。
前提条件
- OSのセットアップが完了していること
- Javaがインストールされていること
- ElasticSearchがインストールされていること
- まだの場合は、こちらをご参照ください
→ ElasticSearchインストール手順
- まだの場合は、こちらをご参照ください
手順
- 鍵を取得する
rpm --import https://artifacts.elastic.co/GPG-KEY-elasticsearch
- リポジトリ情報を記述する
sudo cat <<EOF >> /etc/yum.repos.d/logstash.repo
[logstash-7.x]
name=Elastic repository for 7.x packages
baseurl=https://artifacts.elastic.co/packages/7.x/yum
gpgcheck=1
gpgkey=https://artifacts.elastic.co/GPG-KEY-elasticsearch
enabled=1
autorefresh=1
type=rpm-md
EOF
- インストールを実行する
# sudo yum install logstash
このようなエラーでyumがちゃんと動かないとき
OSError: [Errno 117] 構造体を内容消去する必要があります: '/var/lib/yum/yumdb/m/cbcc7e4e0227b0484ce688c52ab6f962e32c9e8e-mysql-community-common-5.7.22-1.el7-x86_64/checksum_type'- yumのデータに問題があるようです。以下の情報を参考にして復旧します。
参考:http://radiumproduction.blog.shinobi.jp/server/yum%E3%81%8C%E6%AD%BB%E3%82%93%E3%81%A0%E3%82%8C%E3%81%99%E3%81%8B まずは死んだファイルを移動します。ファイル単位で移動するとI/Oエラーを吐かれますが、 ディレクトリごとならエラーを吐くことなく移動することが出来ます。 sudo mv /var/lib/yum/yumdb /var/lib/yum/yumdb.bak 移動できたら中身を全部cpで戻します。 sudo cp /var/lib/yum/yumdb.bak /var/lib/yum/yumdb 死んでるファイルはI/Oエラーでコピーされないので生きてるファイルだけがコピーされます。- サービス再読込
# systemctl daemon-reload
- logstash起動
# systemctl start logstash.service
HelloWorldを試す
- logstashで標準入力からの入力を受け付けます。
# /usr/share/logstash/bin/logstash -e 'input { stdin { } } output { stdout {} }'
以下のような感じになれば、起動できています。
# bin/logstash -e 'input { stdin { } } output { stdout {} }' OpenJDK 64-Bit Server VM warning: If the number of processors is expected to increase from one, then you should configure the number of parallel GC threads appropriately using -XX:ParallelGCThreads=N WARNING: Could not find logstash.yml which is typically located in $LS_HOME/config or /etc/logstash. You can specify the path using --path.settings. Continuing using the defaults Could not find log4j2 configuration at path /usr/share/logstash/config/log4j2.properties. Using default config which logs errors to the console [INFO ] 2019-05-17 14:30:07.809 [main] writabledirectory - Creating directory {:setting=>"path.queue", :path=>"/usr/share/logstash/data/queue"} [INFO ] 2019-05-17 14:30:07.884 [main] writabledirectory - Creating directory {:setting=>"path.dead_letter_queue", :path=>"/usr/share/logstash/data/dead_letter_queue"} [WARN ] 2019-05-17 14:30:09.173 [LogStash::Runner] multilocal - Ignoring the 'pipelines.yml' file because modules or command line options are specified [INFO ] 2019-05-17 14:30:09.194 [LogStash::Runner] runner - Starting Logstash {"logstash.version"=>"7.0.1"} [INFO ] 2019-05-17 14:30:09.327 [LogStash::Runner] agent - No persistent UUID file found. Generating new UUID {:uuid=>"545fb667-7cf1-4c7e-a6d0-d693c09649df", :path=>"/usr/share/logstash/data/uuid"} [INFO ] 2019-05-17 14:30:24.444 [[main]-pipeline-manager] javapipeline - Starting pipeline {:pipeline_id=>"main", "pipeline.workers"=>1, "pipeline.batch.size"=>125, "pipeline.batch.delay"=>50, "pipeline.max_inflight"=>125, :thread=>"#<Thread:0x396b700a run>"} [INFO ] 2019-05-17 14:30:24.856 [[main]-pipeline-manager] javapipeline - Pipeline started {"pipeline.id"=>"main"} [INFO ] 2019-05-17 14:30:25.092 [Ruby-0-Thread-1: /usr/share/logstash/lib/bootstrap/environment.rb:6] agent - Pipelines running {:count=>1, :running_pipelines=>[:main], :non_running_pipelines=>[]} The stdin plugin is now waiting for input: [INFO ] 2019-05-17 14:30:26.200 [Api Webserver] agent - Successfully started Logstash API endpoint {:port=>9600}- HelloWorldを打ってみる (標準入力を標準出力に送る)
- 以下の文字列を入力します
hello world
- 以下のような内容が出力されれば成功です
/usr/share/logstash/vendor/bundle/jruby/2.5.0/gems/awesome_print-1.7.0/lib/awesome_print/formatters/base_formatter.rb:31: warning: constant ::Fixnum is deprecated
{
"@version" => "1",
    "host" => "localhost.localdomain",
"@timestamp" => 2019-05-17T05:31:57.607Z,
 "message" => "hello world"
}
Ctrl + Cで標準入力からの受付を終了します
HelloWorldをElasticSearchに送ってみる
事前準備
- ログの確認の際に、Kibanaを使用します。
- まだの場合は、こちらをご参照ください
→ Kibanaインストール手順
- まだの場合は、こちらをご参照ください
手順
- 定義ファイルを作成します。
# vim /etc/logstash/conf.d/helloworld.conf
記述内容
input { stdin { } } filter { } output { elasticsearch { hosts => ["localhost"] index => "helloworld_log" } }- logstashで標準入力からの入力を受け付けます。(起動に時間がかかりますので、しばらく待ちます)
# /usr/share/logstash/bin/logstash -f /etc/logstash/conf.d/helloworld.conf
以下の文字列を入力します
hello world
ElasticSearchにデータが入ったことをKibanaで確認します。
※ここからはKibanaを操作します。
Kibanaの操作
- ブラウザからKibanaにアクセスします。
- http://[KibanaをインストールしたサーバのIPアドレス]:5601
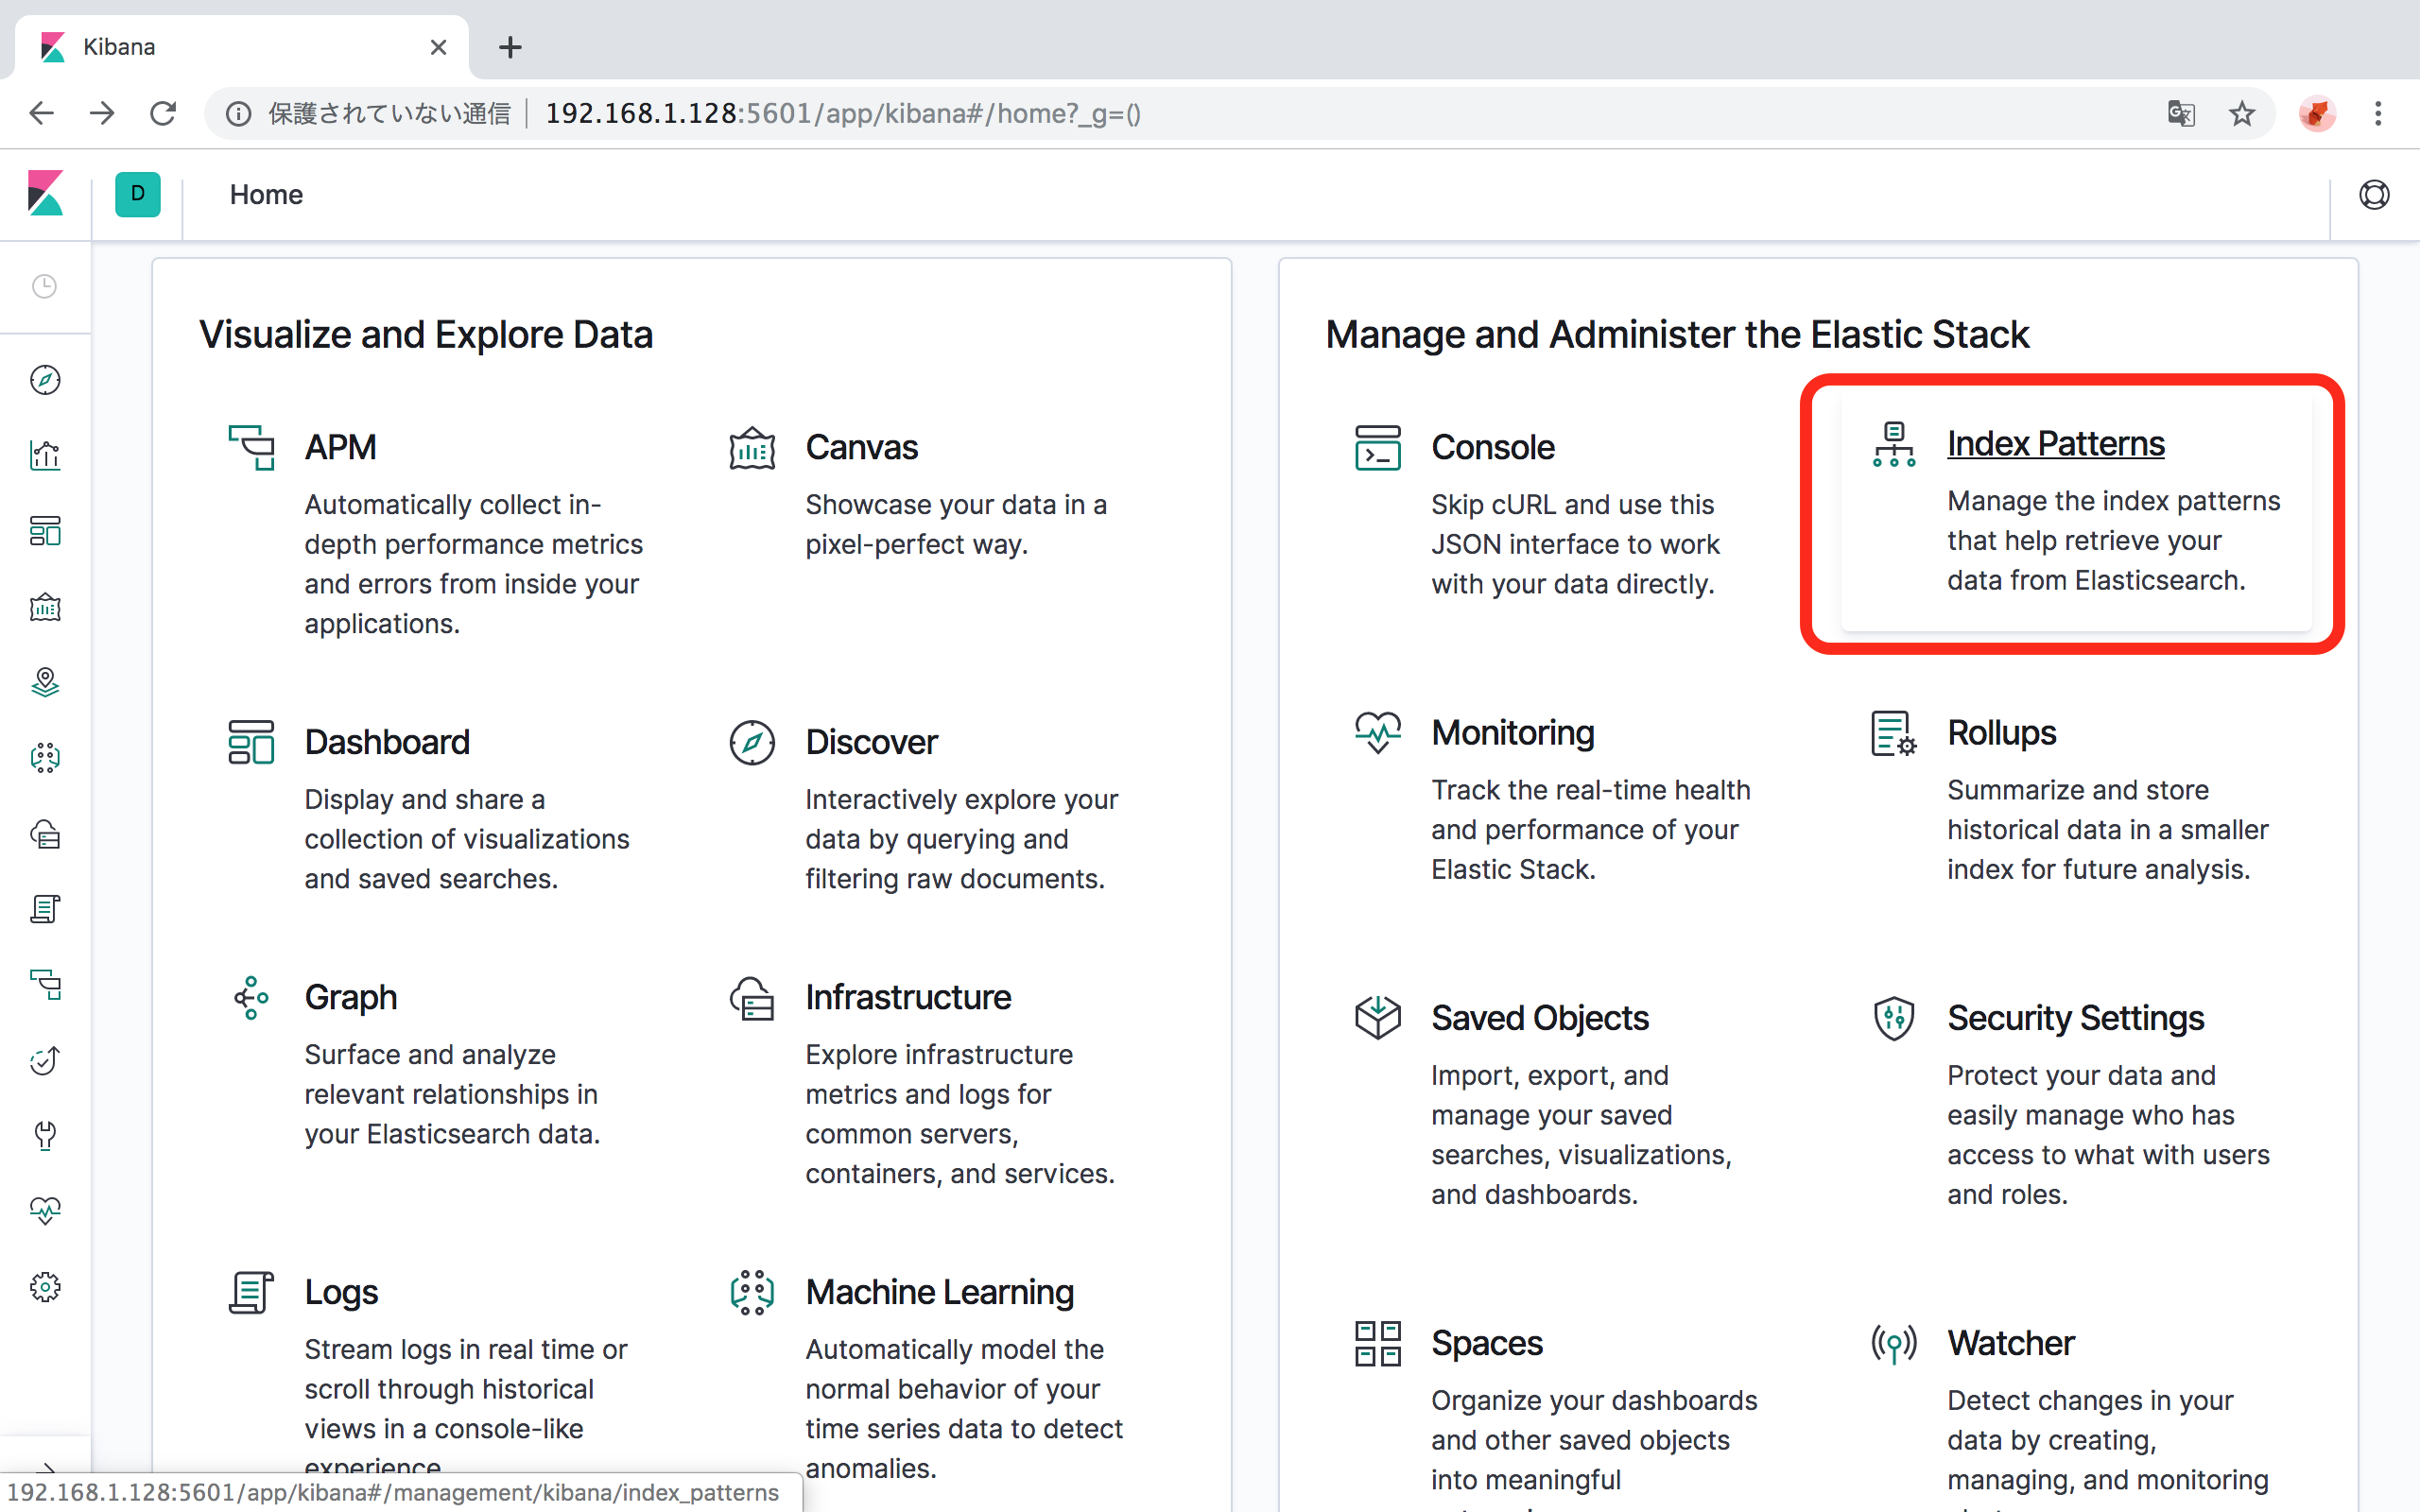
「Manage and Administer the Elastic Stack」の「Index Patterns」をクリックします。
「Create Index Pattern」ボタンをクリックします。
「Step 1 of 2: Define index pattern」 の「Index pattern」に、Index名を入力します。
- 本手順に従った場合は、
helloworld_logと入力します。 - 本手順で
/etc/logstash/conf.d/helloworld.confの中の、output 階層内のindex => "helloworld_log"と記載された部分がIndexです。 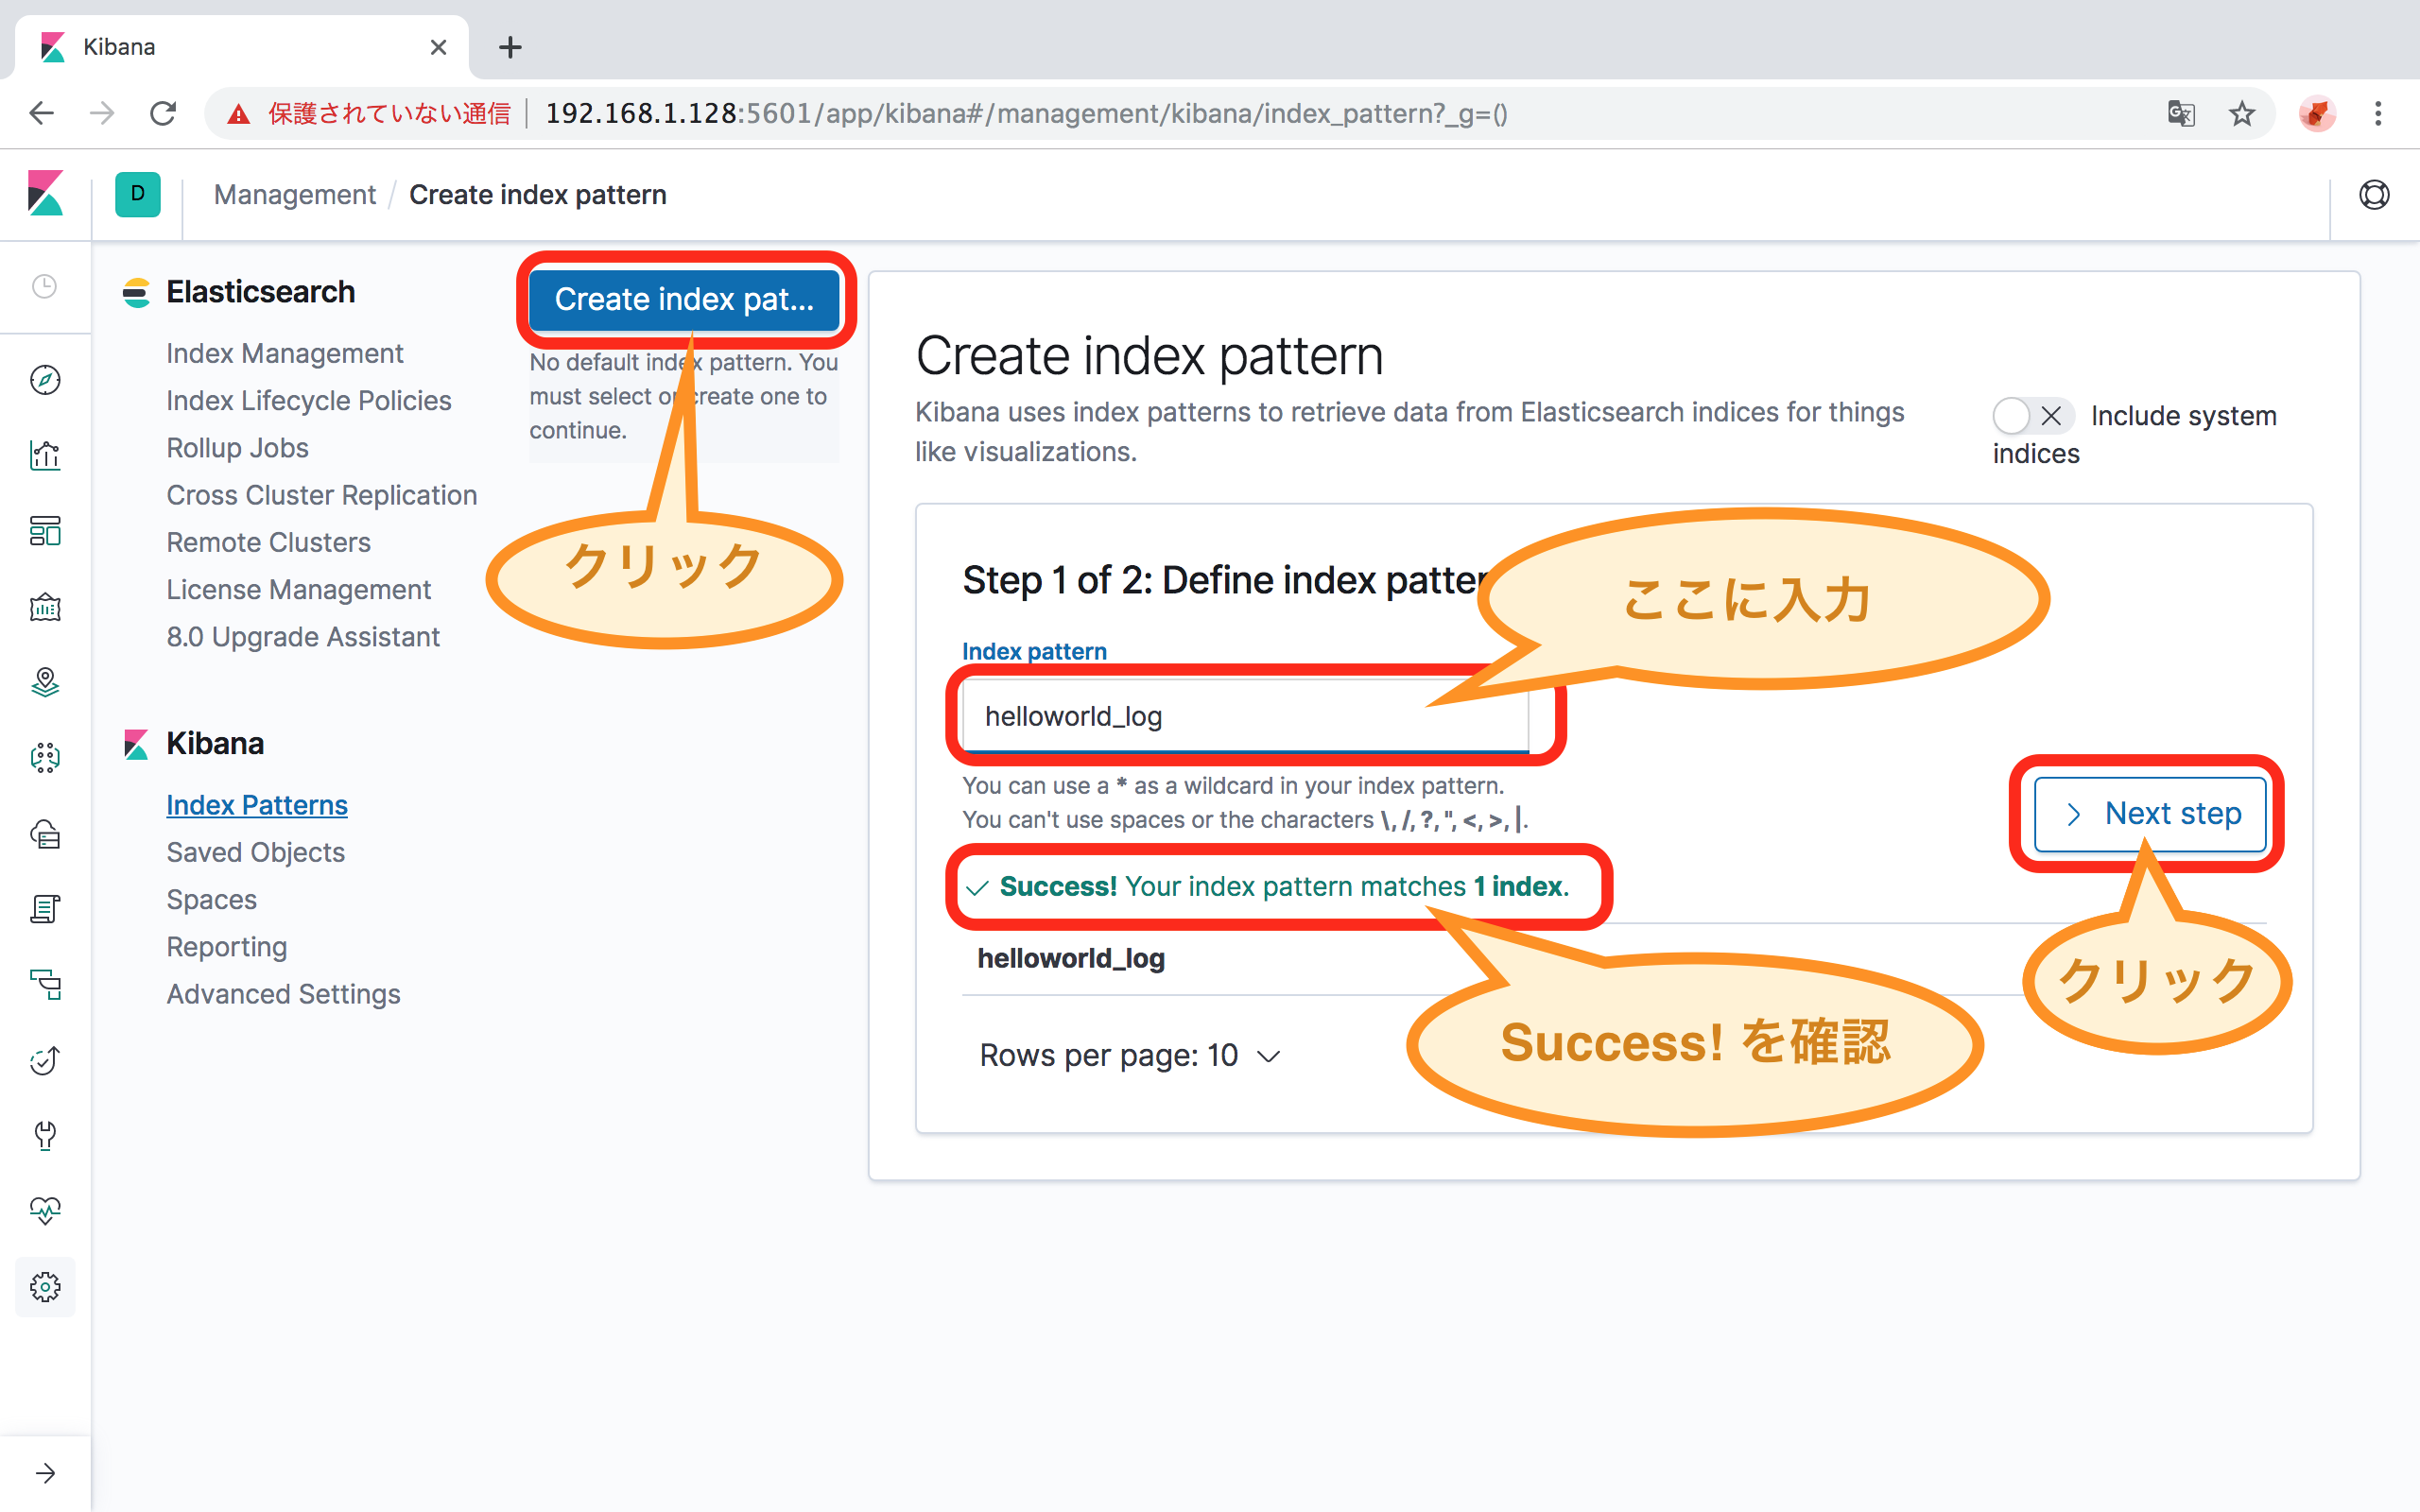
- 本手順に従った場合は、
「> Next Step」ボタンをクリックします。
ログを時系列に並べるときに使用するfield nameを指定します。
- 本手順に従った場合は、
@timestampを選択します。 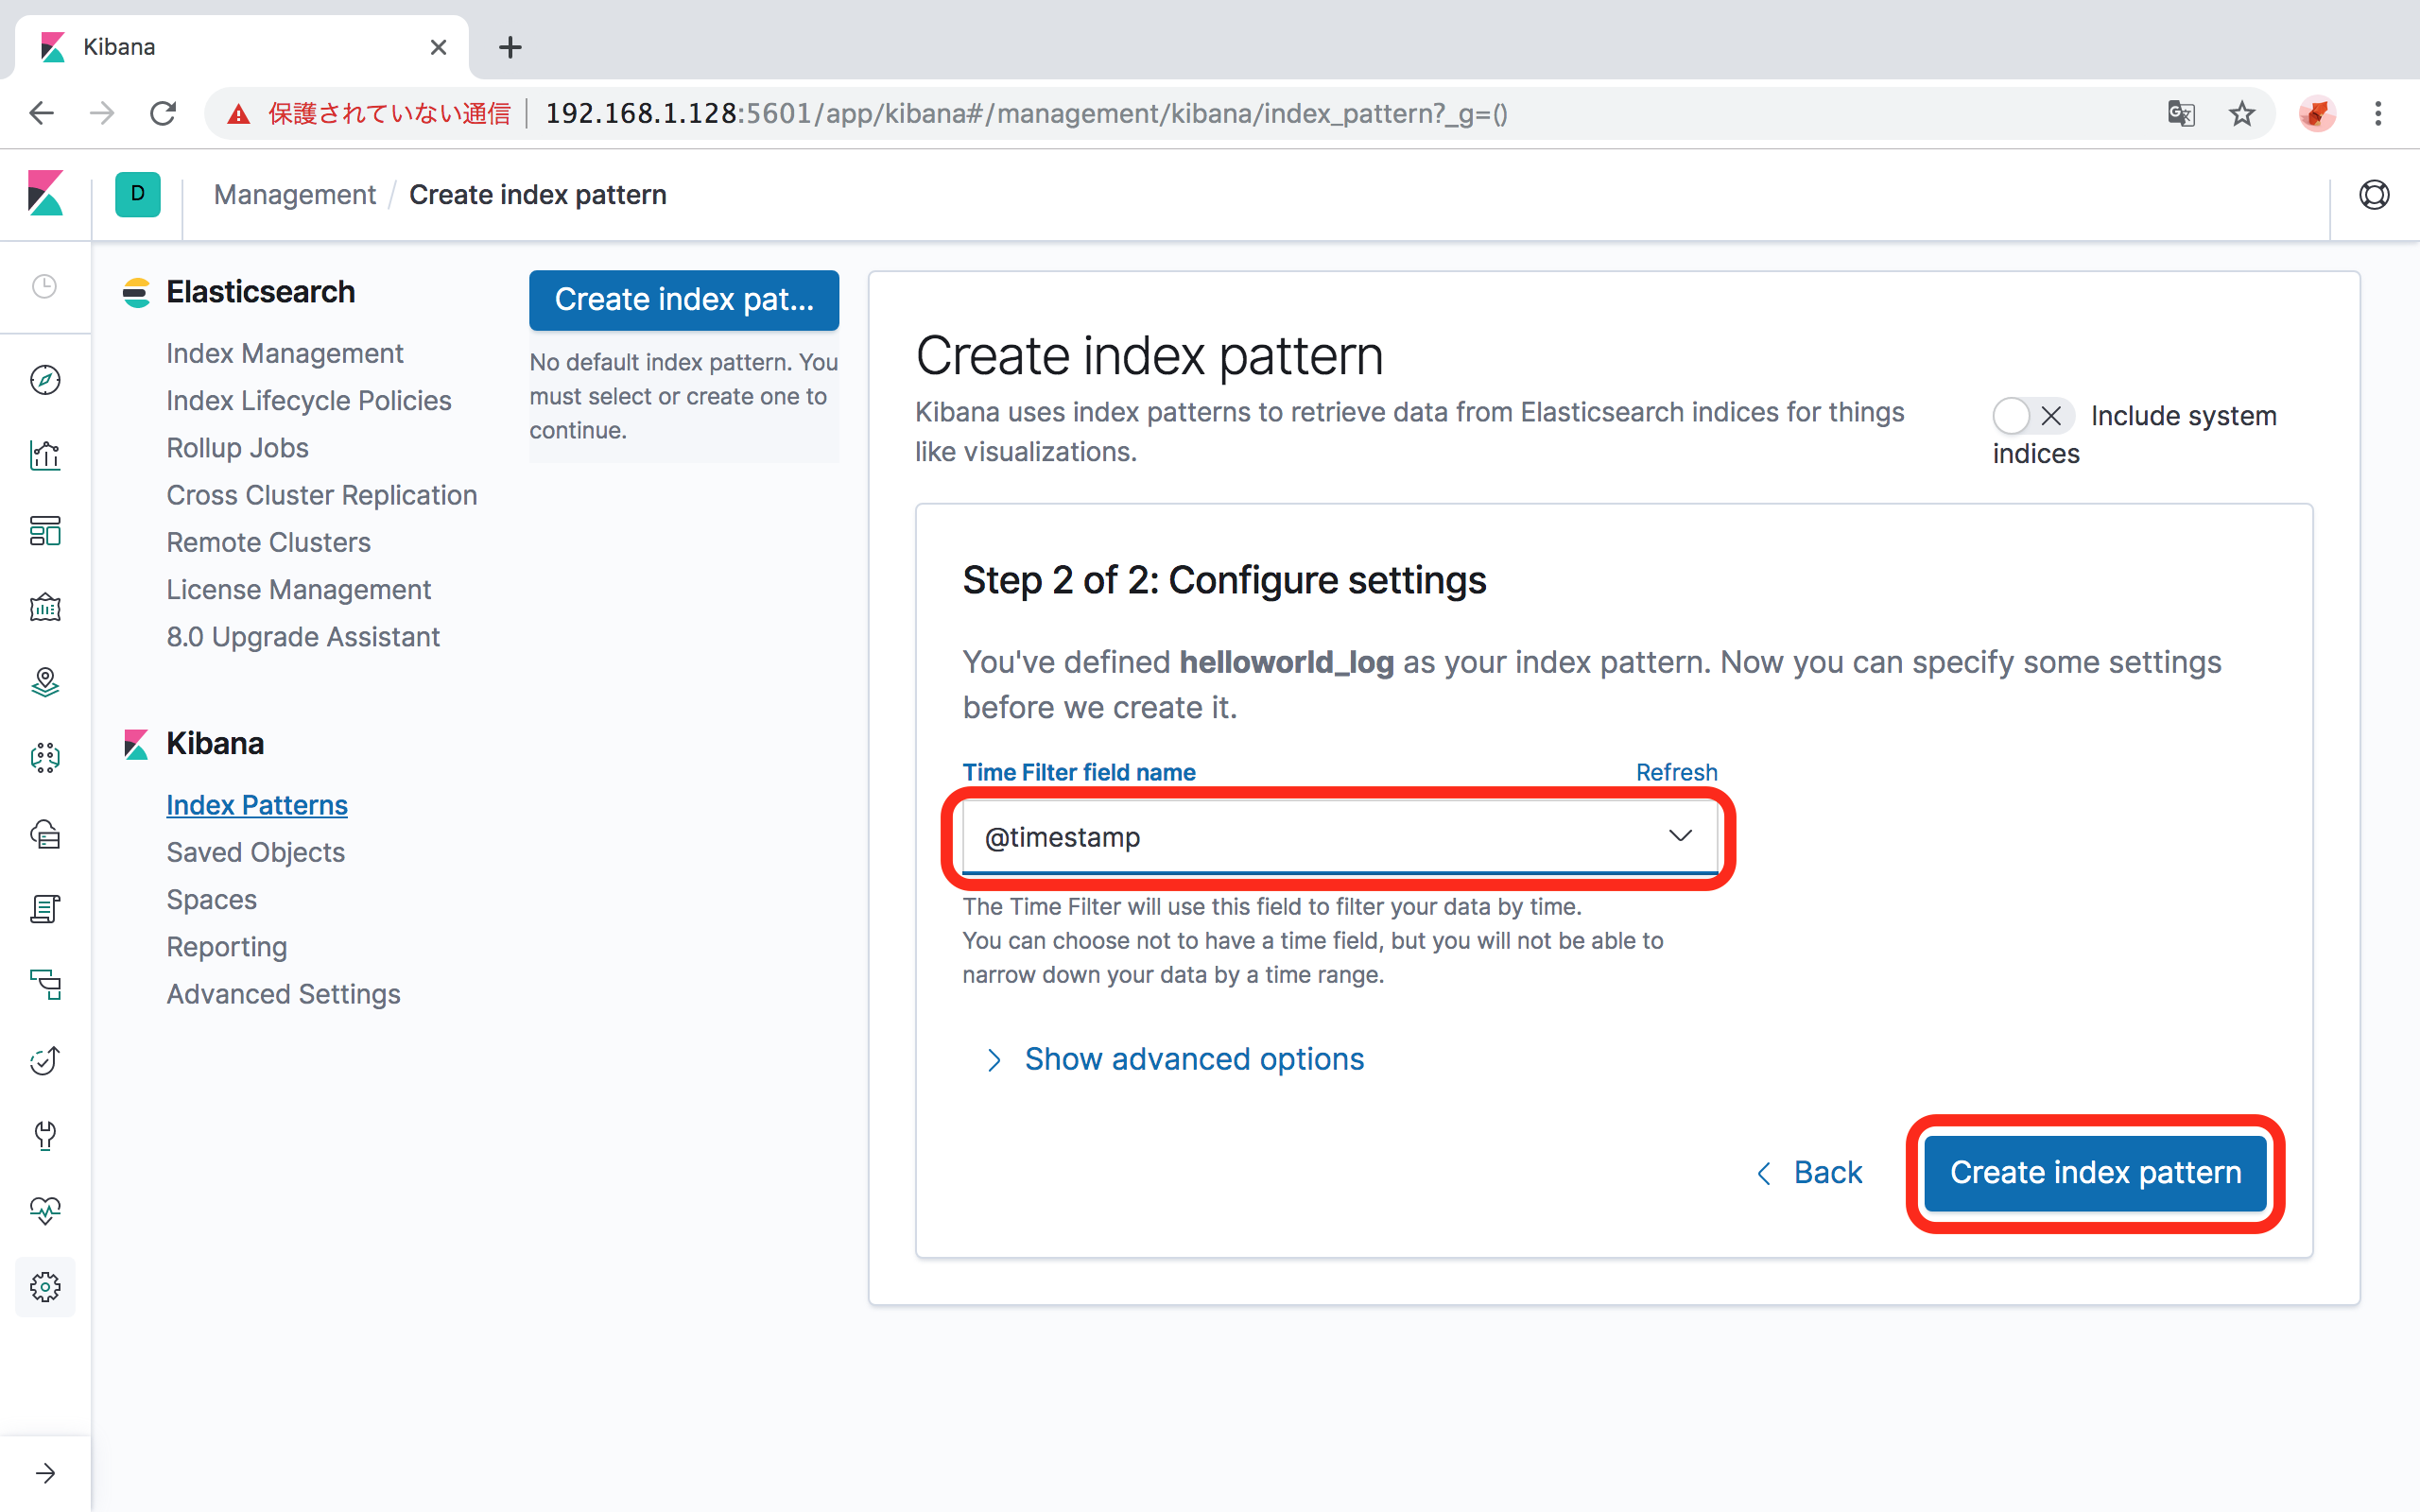
- 本手順に従った場合は、
「Create Index Pattern」ボタンをクリックします。
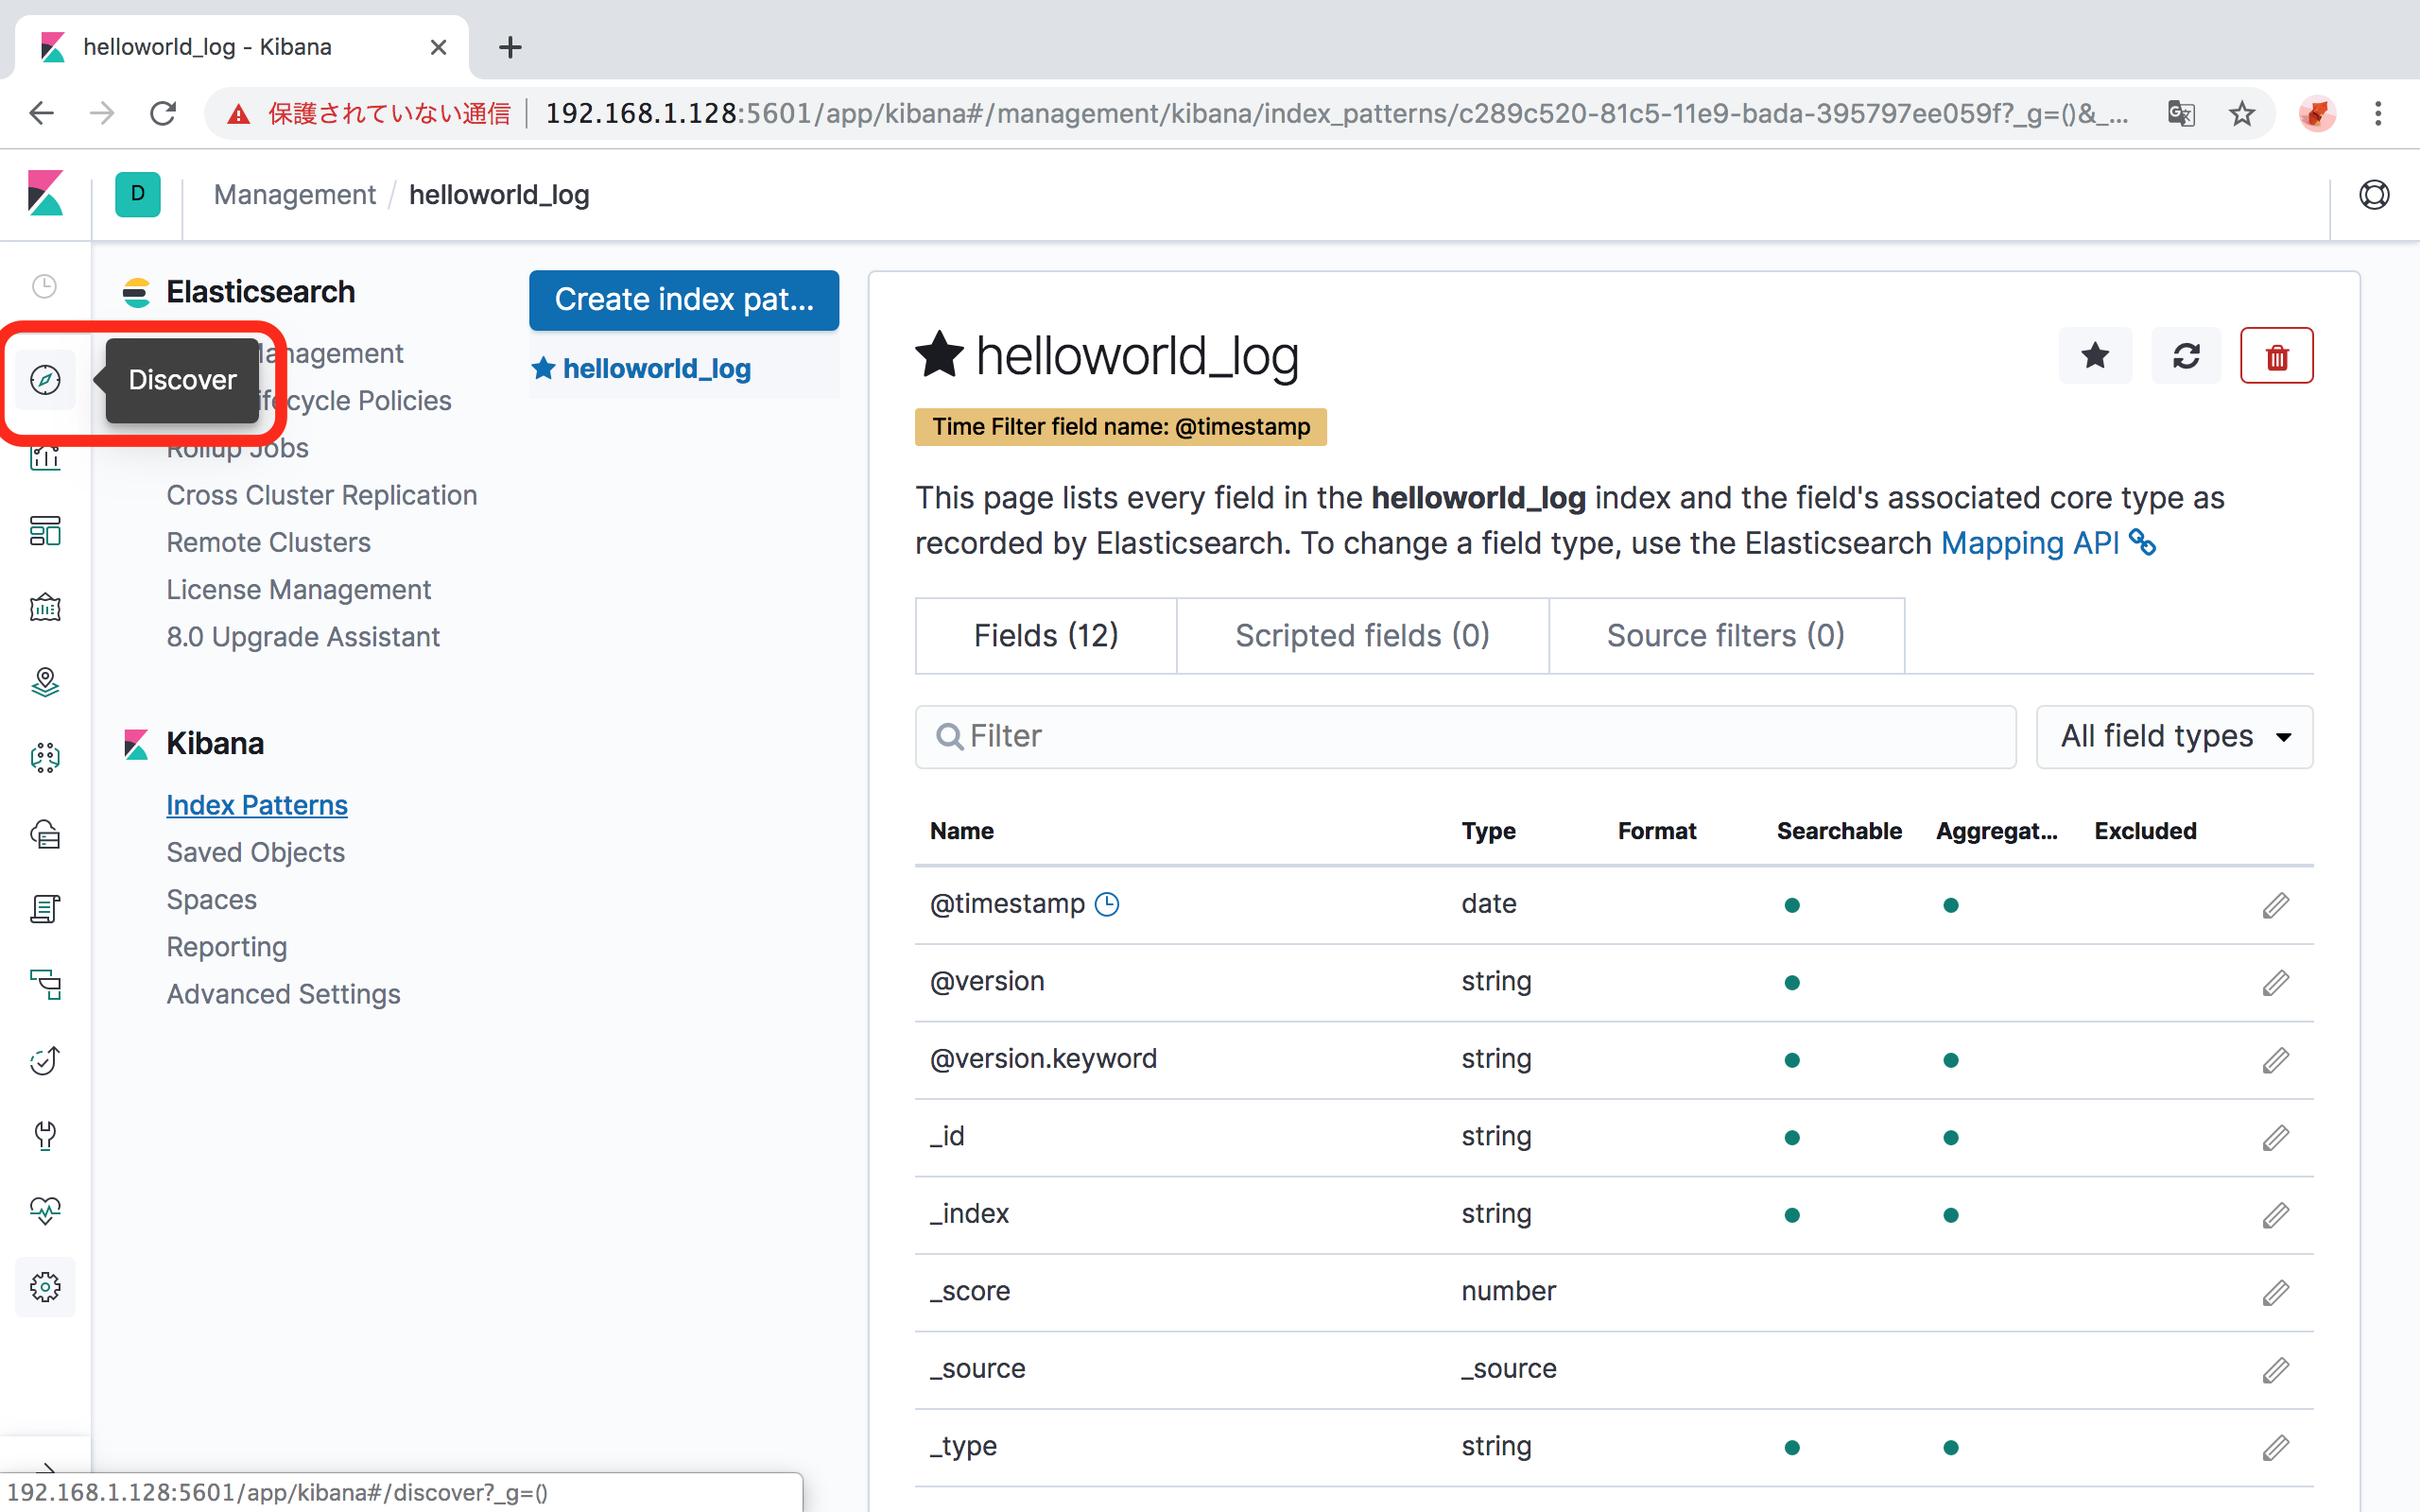
- 数分待っても終わらなければ、ElasticSearchに書き込み制限がかかっている可能性があるので、以下のコマンドで解除してやり直してください。
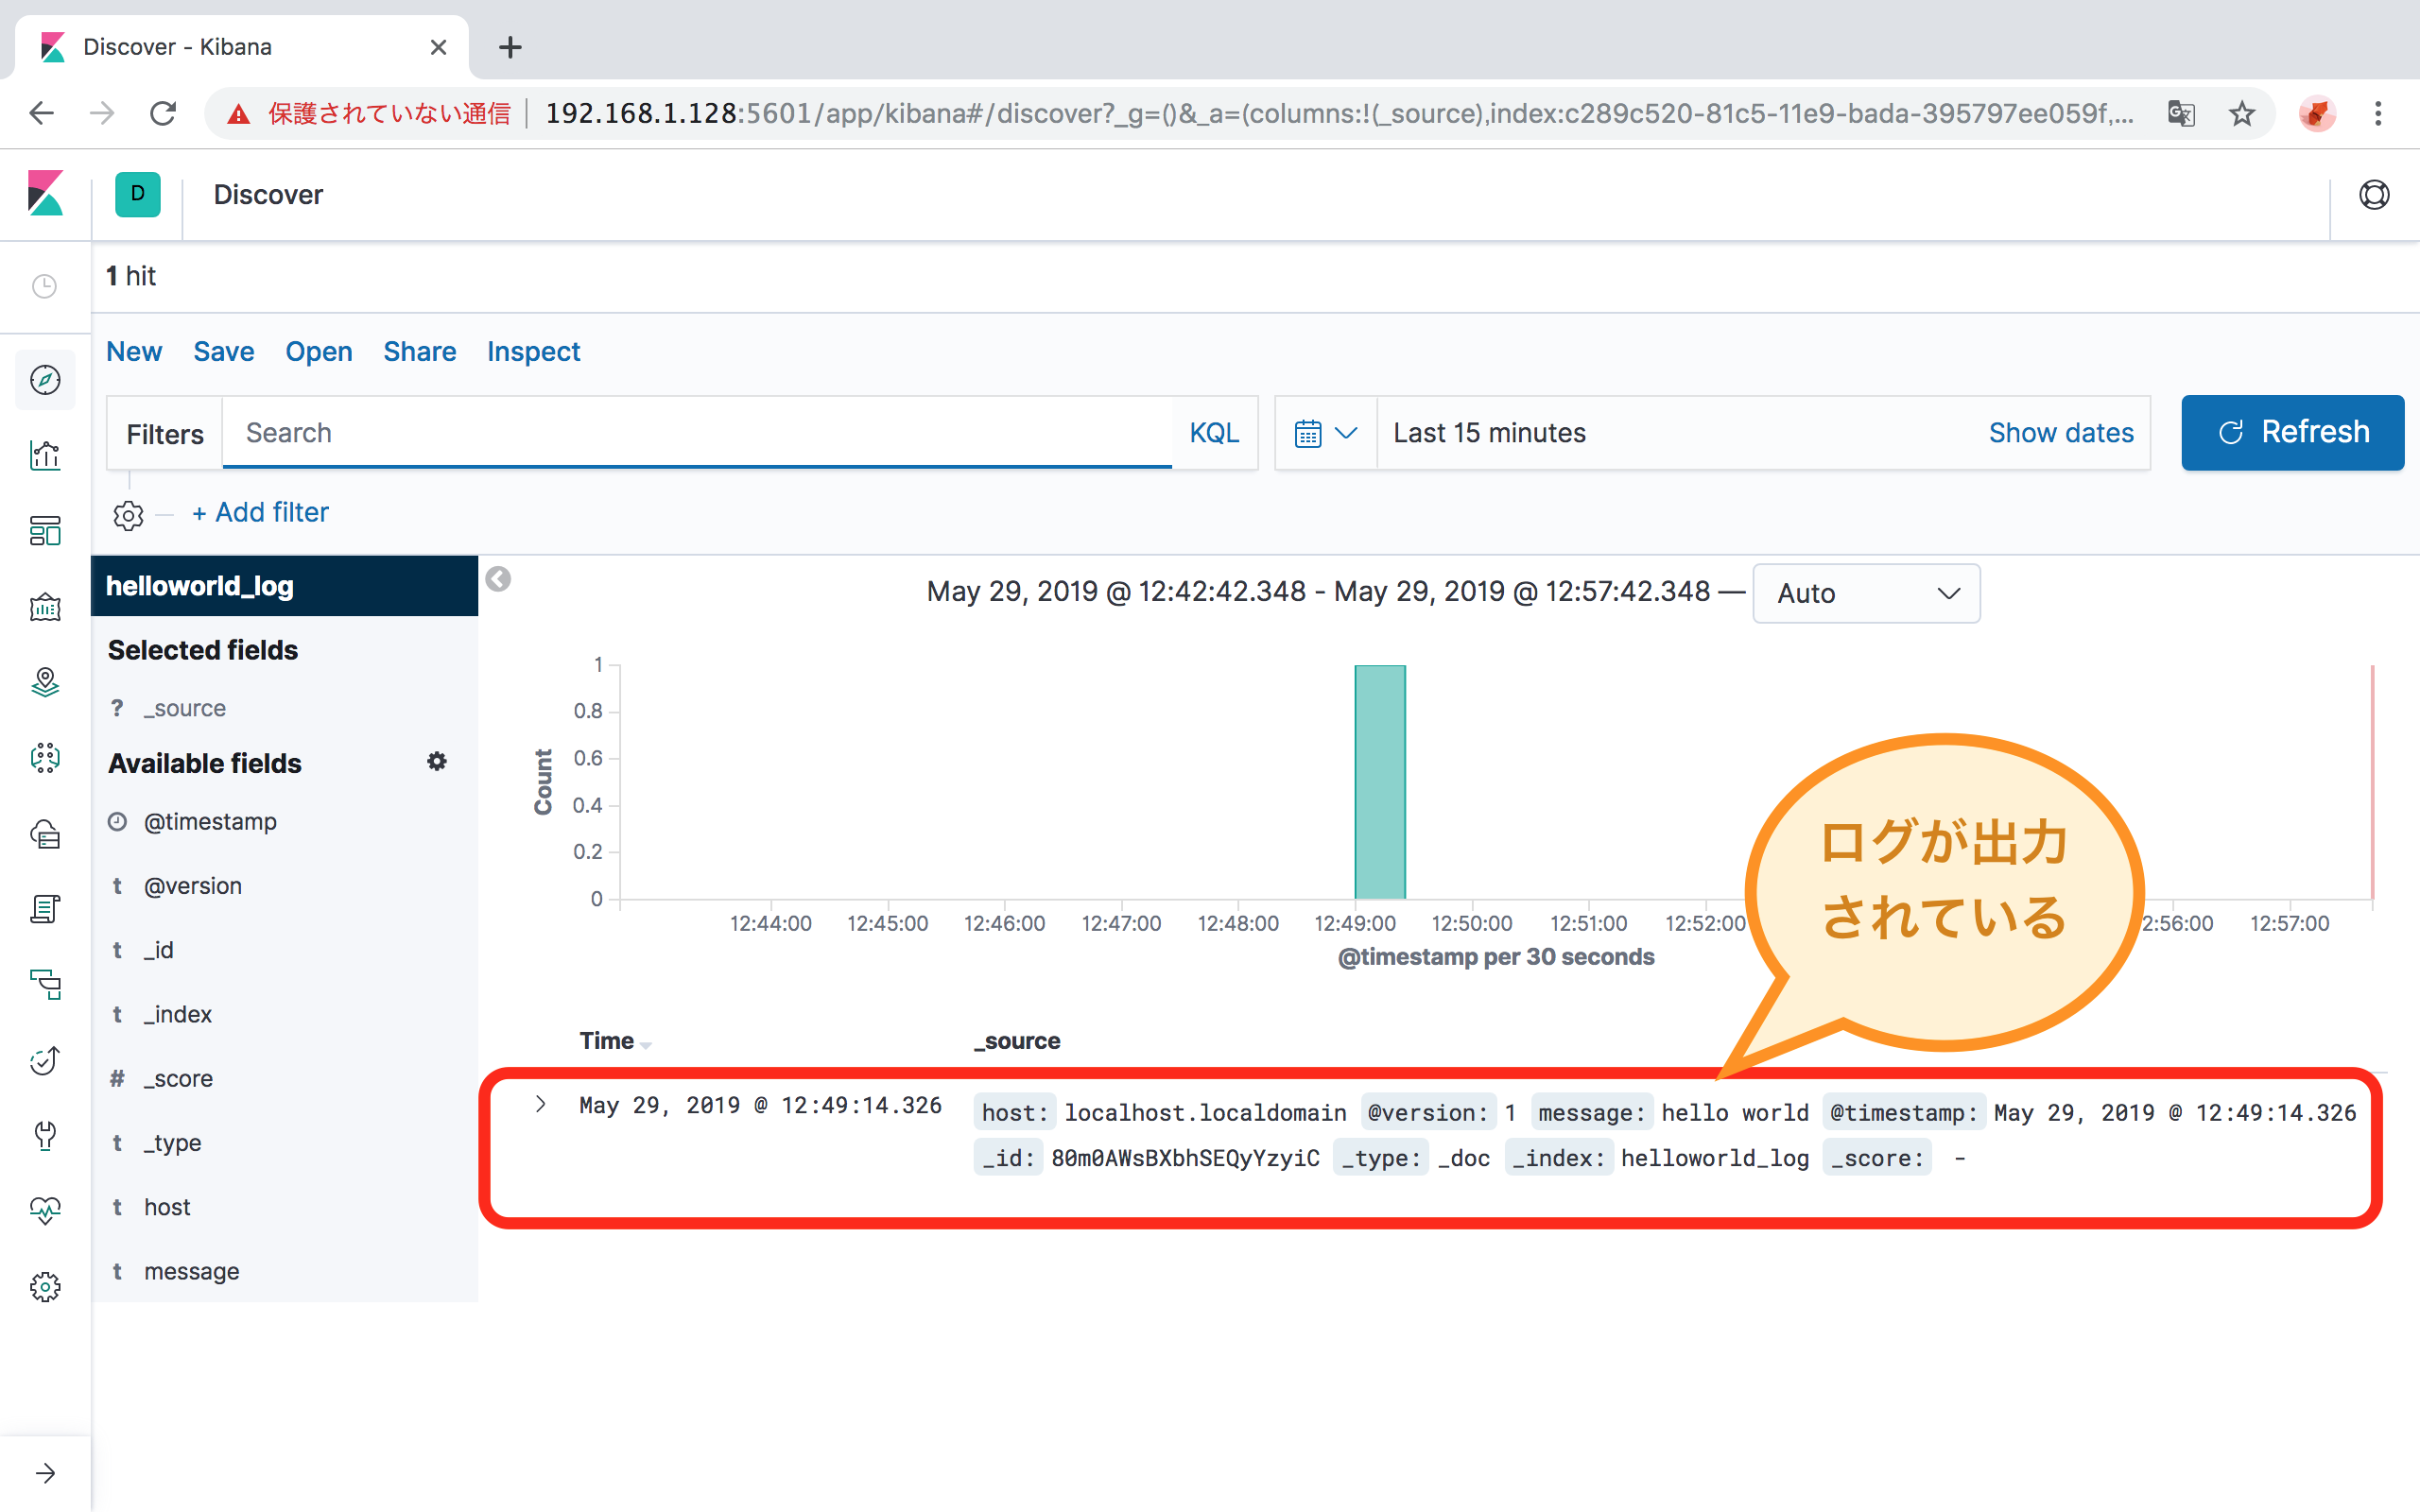
curl -XPUT -H "Content-Type: application/json" http://localhost:9200/_all/_settings -d '{"index.blocks.read_only_allow_delete": null}'Indexの設定が完了したら、左のメニューの「Discover」をクリックして、データを確認します。
参考文献
- https://www.elastic.co/guide/en/logstash/current/installing-logstash.html#_yum
- https://www.elastic.co/guide/en/logstash/current/first-event.html#first-event
- https://qiita.com/quotto/items/8250c67ced43dc83b770#%E8%A8%AD%E5%AE%9A
- https://qiita.com/micci184/items/5d8a4abd3dafc045d29c
- コメントを追加
- 閲覧数 3859
画像
herbal incense florida
superior mold remediation <a href=""> https://forums.dieviete.lv/profils/127605/forum/ </a> health care pa
コメントを追加